Tuesday, May 25, 2010
Fabric Flower Tutorial
Okay, finally, here's the tutorial for the fabric flower that is in my Pretty Pinafore movie. I didn't take pictures while I was making it because I thought it would turn out like my Spring Flower Brooch. But it didn't so that's why this is late.
First cut a strip off of your fabric, the whole width is fine. Mine is 4" tall. Fold the fabric in half lengthwise and thread a needle with lots of thread.
Get ready to sew long stitches like this :).
So make a knot at the fold near the end.
Then sew long gatherins stitches, curving down to the long cut edge.
After you've sewn 4 or 5 inches, pull the thread to gather and start rolling the strip like a cinnamon roll.
Sew through the bottom to secure.
And then continue sewing more gathering stitches along the cut edge. You will be sewing a bit, pulling to gather, wrapping and securing, and then repeating. Keep in mind that the more gathered your flower is, the fuller and more "bloomed" the flower will be (see pic at end). The flower that I'm sewing here is less gathered and bloomed.
Here I am securing a bit that I just gathered and wrapped.
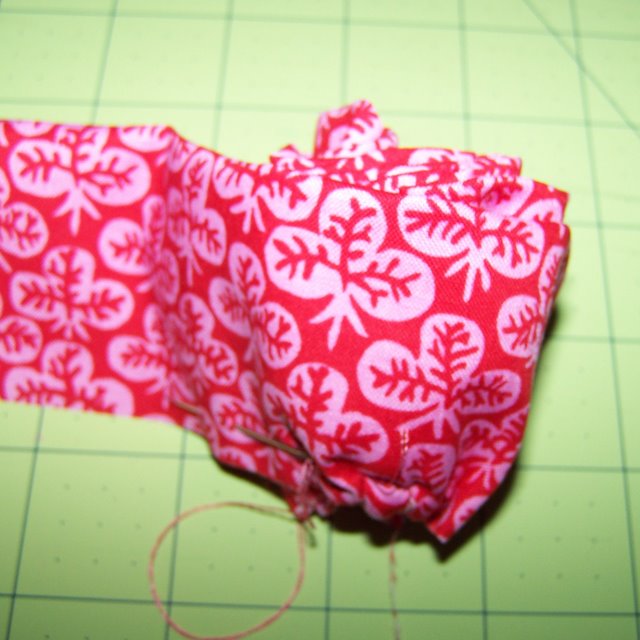
Near the end I wasn't gathering too much, mostly just pulling the thread a little, and then wrapping and securing.
When you get to the end, curve your line of stitching up to the fold so your cut edges will be at the bottom,
And the flower will have a nice little sloped edge on one side.
Stitch the bottom all together again to be sure it won't come apart.
At this point, you could hot glue a piece of felt on the bottom like my other flower has. I skipped it this time. And so far, I have just pinned this to things from the inside. I'm afraid to wash it. Let me know if you do and what happens...
So here is what it will look like if you have not so much gathering:
And this one has lots of gathering - it's in full bloom!
Good luck and don't forget we have a flickr pool so you can show off what you've made.
Wednesday, May 19, 2010
My One Minute Movie
I have a new pattern for sale on my website today, and a video on youtube too! I had the idea to make this as I was rocking Cadie to sleep one night. People keep telling me I need to make a video tutorial, but I am just too video-camera shy. So this was what I came up with:
I know, it's kind of dorky. My kids love it and keep asking me how the scissors cut by themselves. I tell them I'm magic and they believe me. Then we dance.
Thursday, May 13, 2010
Connors Quilt - Part 2
I finally got to work more on Connor's quilt last night. He wasn't in bed yet, so he watched a little. When he saw me piecing the back together he got confused and asked if I was sewing a quilt for his brother too. Then he got excited to hear that his quilt would have two parts. He wanted to put it on his bed already.
I like the way it turned out. It's coming along a lot faster than Chloe's quilt. Of course, her's is probably 6 times as big! Now I just have to bind it. I am inclined to use black binding because I already have a couple packages. Black would look fine with the back, but I'm not sure about the front. Any opinions?
Come to think of it, I think I'll post a poll. I've been itching to try it. So please vote!!!!! (but that does that mean I have to listen?????) Oh, another poll!
Monday, May 10, 2010
Happy Mother's Day - something to make your life easier...Sew on a button with your sewing machine!
So today, one day late, I will share with you a little secret that you will love if you hate sewing by hand. I acutally like sewing by hand, but there was a time when I didn't, and that's when I figured this out. I'm going to show you how to sew on a button (flat button - I'm not magic) with any sewing machine that can do zig-zag. I'm sure I'm not the only one who's figured this out, it is probably taught in a book somewhere, but when I googled it, the only results that I found required a special tool. My method requires some fiddling, but no special tool =).
Get together your button, fabric, matching thread, and a toothpick.
Put your fabric in place and place the toothpick right on the spot where you want to sew the button, right under the center of the presser foot. The toothpick keeps the button from being sewn on so tightly that it is hard to fit through the buttonhole later.
Balance your button on top of the toothpick, so the toothpick is between the holes on the button, and you can see the fabric underneath.
Now comes the fiddling. Turn your stitch style to zig-zag and stitch length to zero. Then move your needle by hand (using the turning wheel on the right side of your machine) while you adjust the stitch width so that the needle goes down into one of the button holes, comes up, and goes down into the other button hole.
Move the needle up and down by hand for a few stitches until you are sure that everything is adjusted properly.
Then you can use your foot to really sew that button on!
When you have made 10-20 stitches, carefully pull the whole stack out from your sewing machine.
Use your seam ripper to help you pull the threads to the back. Tie them and cut.
Sweet!
Labels:
button,
sew a button,
sewing,
sewing machine,
tutorial
Tuesday, May 4, 2010
Subscribe to:
Posts (Atom)


