Showing posts with label tutorial. Show all posts

Monday, October 31, 2011

Making your own rib-knit waistband.


I know it's technically Halloween today, but all our costumes are done, so I got started on my Christmas sewing (yay!) by making these soft and comfy pj pants. I've made a bunch of things lately with rib knit waistbands (underwear, a skirt, shorts) so I thought this pattern might be cute with one too.

This is a waistband that I really like because it's cute and comfortable and easy to adapt to almost any skirt or pants pattern that would normally have an elastic casing. If you are worried about it holding the pants or skirt up,
you can still put elastic inside.


Thursday, July 22, 2010

Happy Birthday to carolina fair designs... with a new tutorial for you!

I almost didn't even notice it, but carolina fair designs is one year old! It was this month last year that I listed my first pattern for sale on etsy. So to celebrate let's all make a "Mom is not a messenger" bag! I made this bag because I wanted a messenger style purse/diaperbag, but I hate the thought of being a messenger. A mom's job is much more important (and much harder!) than a messenger's. Here's the tutorial in a picture format so you can preview it, and then you can download the pdf by clicking here. Have fun!


Tuesday, May 25, 2010

Fabric Flower Tutorial


Okay, finally, here's the tutorial for the fabric flower that is in my Pretty Pinafore movie. I didn't take pictures while I was making it because I thought it would turn out like my Spring Flower Brooch. But it didn't so that's why this is late.


First cut a strip off of your fabric, the whole width is fine. Mine is 4" tall. Fold the fabric in half lengthwise and thread a needle with lots of thread.


Get ready to sew long stitches like this :).


So make a knot at the fold near the end.


Then sew long gatherins stitches, curving down to the long cut edge.


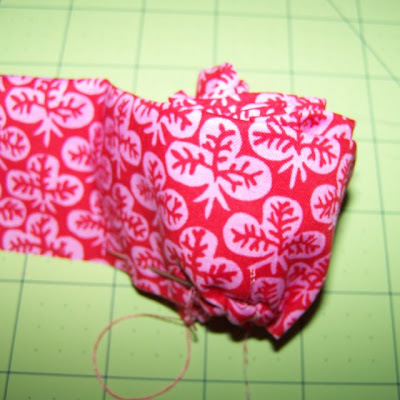
After you've sewn 4 or 5 inches, pull the thread to gather and start rolling the strip like a cinnamon roll.


Sew through the bottom to secure.


And then continue sewing more gathering stitches along the cut edge. You will be sewing a bit, pulling to gather, wrapping and securing, and then repeating. Keep in mind that the more gathered your flower is, the fuller and more "bloomed" the flower will be (see pic at end). The flower that I'm sewing here is less gathered and bloomed.


Here I am securing a bit that I just gathered and wrapped.


Near the end I wasn't gathering too much, mostly just pulling the thread a little, and then wrapping and securing.


When you get to the end, curve your line of stitching up to the fold so your cut edges will be at the bottom,


And the flower will have a nice little sloped edge on one side.


Stitch the bottom all together again to be sure it won't come apart.

At this point, you could hot glue a piece of felt on the bottom like my other flower has. I skipped it this time. And so far, I have just pinned this to things from the inside. I'm afraid to wash it. Let me know if you do and what happens...

So here is what it will look like if you have not so much gathering:


And this one has lots of gathering - it's in full bloom!


Good luck and don't forget we have a  flickr pool so you can show off what you've made.

Monday, May 10, 2010

Happy Mother's Day - something to make your life easier...Sew on a button with your sewing machine!


I know it's the day after Mother's Day, but I was busy being spoiled by my husband and kids yesterday. It was lovely.

So today, one day late, I will share with you a little secret that you will love if you hate sewing by hand. I acutally like sewing by hand, but there was a time when I didn't, and that's when I figured this out. I'm going to show you how to sew on a button (flat button - I'm not magic) with any sewing machine that can do zig-zag. I'm sure I'm not the only one who's figured this out, it is probably taught in a book somewhere, but when I googled it, the only results that I found required a special tool. My method requires some fiddling, but no special tool =).


Get together your button, fabric, matching thread, and a toothpick.


Put your fabric in place and place the toothpick right on the spot where you want to sew the button, right under the center of the presser foot. The toothpick keeps the button from being sewn on so tightly that it is hard to fit through the buttonhole later.


Balance your button on top of the toothpick, so the toothpick is between the holes on the button, and you can see the fabric underneath.


 Now comes the fiddling. Turn your stitch style to zig-zag and stitch length to zero. Then move your needle by hand (using the turning wheel on the right side of your machine) while you adjust the stitch width so that the needle goes down into one of the button holes, comes up, and goes down into the other button hole.

Move the needle up and down by hand for a few stitches until you are sure that everything is adjusted properly.

Then you can use your foot to really sew that button on!


When you have made 10-20 stitches, carefully pull the whole stack out from your sewing machine.


Use your seam ripper to help you pull the threads to the back. Tie them and cut.


Sweet!
Related Posts Plugin for WordPress, Blogger...